Check out my Youtube for Lora Creations!!!
How to Use Stable Diffusion AI : A Step-by-Step Tutorial
How to Use Stable Diffusion AI: A Step-by-Step Tutorial
In the dynamic landscape of artificial intelligence (AI), Stable Diffusion AI has emerged as a game-changer, revolutionizing the way we generate images. This powerful tool, which uses a latent diffusion model, can transform simple textual prompts into stunning, detailed images. Whether you’re an AI enthusiast looking to explore new technologies or a content creator seeking innovative ways to generate images, this step-by-step tutorial will guide you on how to use Stable Diffusion AI effectively.
Introduction to Stable Diffusion AI
Stable Diffusion AI is a cutting-edge technology that has taken the world of AI image generation by storm. This technology uses a latent diffusion model to generate images from textual prompts. The process begins with a random image, which is gradually refined until it aligns with the given prompt. The result is a detailed, high-quality image that closely matches the description provided.
The beauty of Stable Diffusion AI lies in its versatility. It can generate a wide range of images, from photorealistic to artistic, making it a valuable tool for artists, content creators, and AI enthusiasts. Moreover, it’s free and can be run on your personal computer, making it accessible to everyone.

Setting up Stable Diffusion AI
Before you can start generating images with Stable Diffusion AI, you need to set it up on your computer. Here’s a step-by-step guide on how to do it:
Step-by-Step Guide to Using Stable Diffusion AI
- Check System Requirements: Ensure that your computer meets the necessary requirements, including an NVIDIA GPU of at least the 20 series and Python 3.10.6.
- Install Python: Download Python 3.10.6 from the official website and make sure to select the option (“Add Python to Path” ) during installation.
- Install Git: Download and install Git, which is required to install the Stable Diffusion web UI and receive updates. You can find the Git installation package on their official website.
- Clone the Stable Diffusion WebUI Repository: Create a new folder where you want Stable Diffusion to be installed locally. Open Command Prompt in that folder where you want to install Stable Diffusion by clearing out the url and typing CMD in the url of that folder then hit enter.
 Command prompt opens with the directory already pointed in that folder path. Then, enter the command “git clone” followed by the URL of the Stable Diffusion WebUI repository from github ( the URL is located when you click on the green “<> Code” button)
  and Press Enter to start the cloning process. Wait until the process completes.
 - Run the WebUI: Once the cloning process finishes, locate the installation folder in Windows Explorer. Look for the “webui-user.bat” file and run it. This will initiate the installation of the remaining components. Wait for the installation to complete. Once finished, you can access the Stable Diffusion web UI by entering the provided address in your web browser.
Now that you’ve set up Stable Diffusion AI, you’re ready to start generating images. Here’s a step-by-step guide on how to do it:
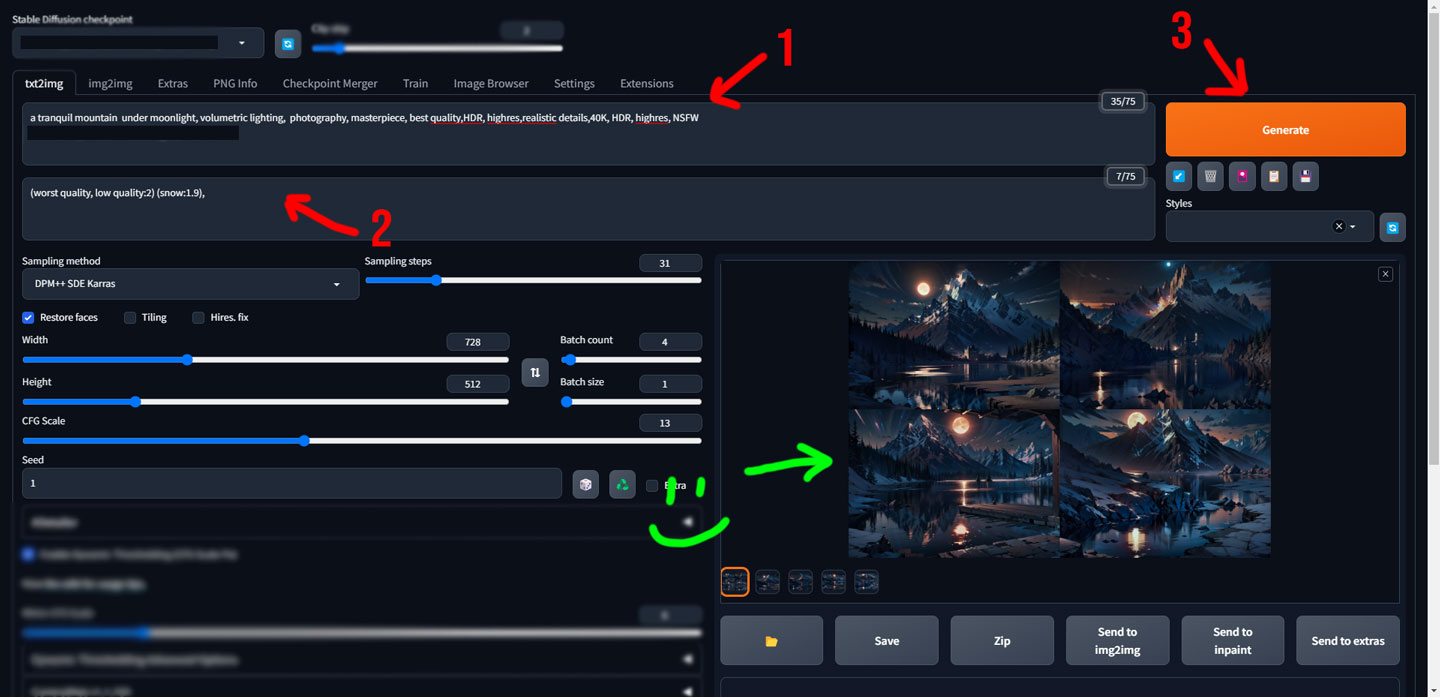
- Create a Textual Prompt: The first step is to create a textual prompt. This is a description of the image you want to generate. The prompt should be detailed and descriptive to guide the AI in generating the image.
- Wait for the Image to Generate: After you run the code, Stable Diffusion AI will start generating the image. This process can take some time, depending on the complexity of the prompt and the power of your computer. Once the image is generated, it will be saved to the same directory where the Stable Diffusion AI code is located.

- View the Generated Image: Finally, you can view the generated image. Open the directory where the Stable Diffusion AI code is located (output folder), and you’ll find the image saved as a .png file.
Tips for Using Stable Diffusion AI Effectively
While Stable Diffusion AI is a powerful tool, using it effectively requires some practice and understanding. Here are some tips to help you get the most out of Stable Diffusion AI:
- Craft Detailed Prompts: The quality of the generated image largely depends on the quality of the prompt. Try to make your prompts as detailed and descriptive as possible.
- Experiment with Different Prompts: Don’t be afraid to experiment with different prompts. The more you experiment, the better you’ll understand how Stable Diffusion AI interprets prompts.
- Be Patient: Generating images with Stable Diffusion AI can take some time, especially for complex prompts. Be patient and give the AI the time it needs to generate the image.

Conclusion
Stable Diffusion AI is a fascinating technology that offers a new way to generate images. With its ability to transform textual prompts into detailed images, it opens up a world of possibilities for artists, content creators, and AI enthusiasts. This step-by-step tutorial provides a comprehensive guide on how to use Stable Diffusion AI, from setting it up to generating images. With some practice and experimentation, you’ll be able to harness the power of Stable Diffusion AI and create stunning, high-quality images.


